Process
Balance and Counterpoint in Form and Surface
By Margaret Haden - Originally Appeared in the Jan/Feb 2018 issue of Pottery Making Illustrated


I first became interested in handbuilding while taking Gail Kendall’s workshop at the Haystack Mountain School of Crafts in Maine. At the time, I was working mostly on the wheel with porcelain and I tended to approach my work through surface techniques that I could obsess over like carving, sprigging, and sgraffito. The forms that I was making came second to the glazing and surface work. I realize now that I was rushing through the building process. Handbuilding allowed me to think about form in much the same way that I thought about surface, and emphasized the need to devote equal time to both.
In graduate school I was able to work on a larger scale. I like solving technical problems involved with creating large, asymmetrical forms that structurally challenge expectations of balance. The scale of these pieces also provides a lot of space to apply a highly decorative surface. The line work and areas of bare clay ground the form and are used as a kind of counterpoint to the glazes and embellishments, which can often mask its shape. These vessels are repetitive in both form and surface, employing patterns with geometric and floral motifs that I approach as decorative works in themselves, with the vessel serving as a type of canvas.
Most of my work is coil built. I use a low-fire earthenware clay body, which is forgiving enough to withstand the high number of firings my work usually requires. I often fire pieces four or five times. After graduate school, I moved into a studio with limited ceramic resources, so I began primarily using commercial products made by a variety of companies. Recently I’ve become interested in having glazes move during the glaze firing, so I tend to do a lot of layering and fire my work between a hot cone 04 and a cool cone 03.
Planning
When building a large form, it’s important to spend time planning ahead. I tend to make some rough sketches to get an idea of how the form will ultimately look, and with a sketch of a traditional vessel form as a base, add angles and undercuts to alter the overall shape. Before finalizing the exact dimensions of the piece, I measure the kiln I will be using to determine how large the piece can be. I use an electric kiln that measures 28×23 inches and can be taken apart in segments. I also make sure that my workspace is clean and that I have two or three tables of different height to work with so, I don’t have to hunch over the piece as it grows. I use a variety of tools, but the most important are my ribs and heat gun.
Creating the Base
Prepare a slab that is about ¾ inch thick or slightly thicker. This slab will hold a large amount of the vessel’s weight. With a rib, compress both sides of the slab and drape it over a bisque or plaster hump mold. While the slab is setting up, begin rolling coils, making them a little more than ½ inch thick. When rolling coils it’s important to stand and apply even pressure as you move your hand across them from side to side; don’t stay in one place. Use your coils to build the piece’s foot, then slip and score the attachment area and add the first coil to the scored area. The foot will be supporting much of the weight of the piece. It should be about ½ inch thick and 2½ inches tall. You won’t have to score and slip each additional coil as long as they are still soft. Overlap the coils and pinch them together with your fingers. Then, using a serrated rib, blend them together (1). With a soft rib, smooth out the coils and use a heat gun to stiffen up the clay between the two sections of the foot. Once the clay reaches a leather-hard state, remove it from the mold and flip it over (2).
Building Up
This piece will have eleven sections. At this point in the building process you’re creating volume, so add your coils at an angle to make the walls flare out. I typically add three coils at a time, scraping them together as I’m building sections that move up, in, and out (3). Because the walls of the form flare in and out, it’s crucial that you use a heat gun or allow the piece to setup before adding more coils. If you add too much weight before the piece has set up to a leather-hard state, the potential of it collapsing or losing its shape is great, so it’s important to smooth your coils together before they get too dry as you build up, in, and out (4). Between each section, use a scalpel or a sharp knife to cut away any rough edges (5)—this is much easier when the piece is almost leather hard. As you continue to build up, repeat the previous steps making sure to use your heat gun, and to score and slip between each of the sections (6, 7).
Vertical vs. Horizontal Sections
Once the clay is cut away to create the undulating rim of the vertical section of the piece, use a heat gun or hair dryer to stiffen the clay up to a firm leather-hard state. This will allow for a crisp edge between the vertical and horizontal sections. As you narrow the section toward the neck of the piece, add 2–3 coils at a time, scraping them together and then using a heat gun to stiffen them up to a leather-hard state. Note: Make sure to slip and score between coils that you plan to dry with a heat gun, as well as the new coils that you add to these drier sections. When adding coils, if the section you’re building flares in, overlap the coils on the inside. If flaring out, overlap the coils to the outside. I often gently hit the walls of the piece with a wooden paddle in order to move inward. Allowing the clay to become leather hard as you build is the only way to maintain the undulations without having the walls of the piece sag or the curves to become distorted. Earthenware clay is very forgiving and will hold its shape well as long as you build slowly, and allow adequate drying time.
Finishing Form
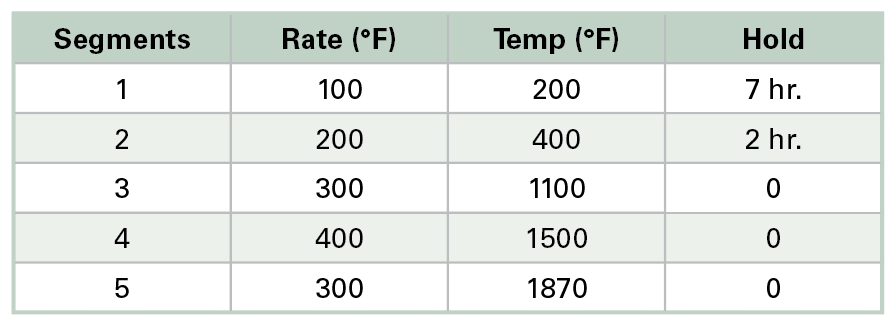
At this point your form should have around ten undulated sections. The foot/base of your piece will start to become dry and fragile, so keep this in mind as you start coiling your final top section (8). Once you have reached your desired height, use a very soft rib to refine and smooth your surface. Drape plastic over your piece and allow it to dry slowly. I bisque fire all of my work to 1870°F (1021°C) using the following program:
After the piece has been bisque fired, use a damp sponge to wipe down its surface, removing any residual dust, then allow it to dry for 24 hours.
Glazing the Interior
Apply 2–3 coats of Amaco LG-11 Opaque White glaze or any other cone 04 glaze with a very soft-bristled brush. Allow the piece to dry for 24 hours before you begin glazing the exterior surface to ensure that the piece is dry enough to absorb the glaze.
Glazing Exterior
I use 3M brand vinyl tape and masking tape (1⁄8-inch and ¼-inch widths) to create stripes where I want the clay body to be exposed (9). Make sure that you don’t pull the tape too tightly across the surface, since this can cause it to detach in areas with more severe angles. The stripes should follow the curves of the piece to accentuate its form. After the piece has been taped, apply three coats of glaze to the exterior. I alternate between a glossy and an opaque white commercial glaze. After your glaze has dried, peel off the tape (10). I usually put the piece back in the kiln and hold it at about 200°F for an hour or two to fully dry.
Next, you can layer colored glazes over the white glaze base. With this piece I applied a glossy clear blue glaze (Spectrum 808-Clear Blue) (11). Using plastic squeeze bottles, apply black underglaze on top of the blue area. Most of my patterns are freehand doodles, which are products of a meditative, almost subconscious process. Once the black underglaze has dried you can use a squeeze bottle to apply glazes on top of the underglaze (I used Spectrum’s Royal Blue and Powder Pink, as well as Gail Kendall Clear plus copper carbonate and cobalt carbonate) (12, 13). During the glaze firing, the layered glaze will move and melt together and obliterate much of the underglaze pattern. If the glaze doesn’t move enough, I add another layer of clear blue glaze and fire it again to 1970°F (1077°C).
Last Layers
Lastly, I apply geometric shapes cut out of solid colored decal paper (14), followed by accents in gold luster which creates depth and a pleasing reflective surface. Before application, clean the surface of the piece. I use cheap, new, soft-bristled brushes during each luster application. It’s important to remember that luster will take on the qualities of the surface to which it’s applied. So if the glaze is shiny, once it’s fired the luster will be shiny; if it’s matte the luster will be matte. Always wear a respirator and either work outside or in a well-ventilated room when applying luster. Fire your lustered piece to cone 018 in a well-ventilated kiln using a fast program.